Panel assembly
Overview
Links in PolyBoard describe the join between 2 panels that are neighbours to each other. Links apply to the outer panels of a cabinet, and also to shelves, uprights, doors and drawers.
As well as describing the relationship between panels and design elements, you can also link to the front of the cabinet.
These links can be modified to create a huge range of custom assemblies.
They can be configured one at a time or most effectively by adding them to Quick Design manufacturing methods for click of a button application to all your design projects.
Link priority
(overpassing, underpassing and mitre joints)
The link priority setting is one of the parameters that allow us to edit the nature of the link or the join between 2 panels.
The 3 options are overpassing, underpassing and a mitre joint.
Overlapping joint
(overpassing panels only)
If you set the link priority of a panel to overpassing, you have the option to add an overlap, which extends it beyond the panel it is assembled to.
You can also apply a negative overlap to reduce its length.
Recess joint
(underpassing panels only)
In this video we’ll create a recess joint, which allows us to add a gap between two panels.
It’s not possible to set the link between a panel and the front of a cabinet to underpassing, which is required for a recess joint.
Instead, we show you how to move a panel forward and backwards in relation to the cabinet frontage by using the overlap feature.
Groove joint / rebate joint
(underpassing panels only)
In this video we’ll show you how to create a groove joint. The first step in the process is to create a rebate joint so that’s covered here too.
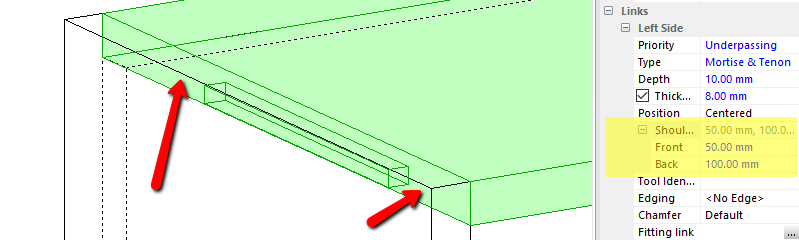
Mortise and tenon joint / tongue and groove joint
(underpassing panels only)
The mortise and tenon feature is really a feature for creating tongue and groove joints, with a shoulder to hide it if required. It also allows you to create a dodo and rebate joint and a double rebate joint as you’ll see in this video.
Update: an asymmetrical shoulder is now possible, see the image below:
Halving joint
How to add a halving joint assembly to your cabinets.
For extra flexibility the second panel you add to complete this assembly is defined as a free division which allows it to be positioned at an angle.
Apply a chamfer
In this video we’ll see how a chamfer is applied to a cabinet and how you can modify it.
A chamfer is an angled cut on a panel’s edge. You would use this feature when panels are joined at an angle, typically for a door.
The most common application is to adjust the edge cut of the panel of the door to straight for ease of manufacture.
Adding slack to grooves in PolyBoard
How to use the Groove and Oversizing sub-method to add slack to your groove joints to make assembly easier.