We’ve created a video on how to design a wine rack in PolyBoard, first by creating a complex shape for the sides of the cabinet in CAD and then importing and applying this shape in PolyBoard.
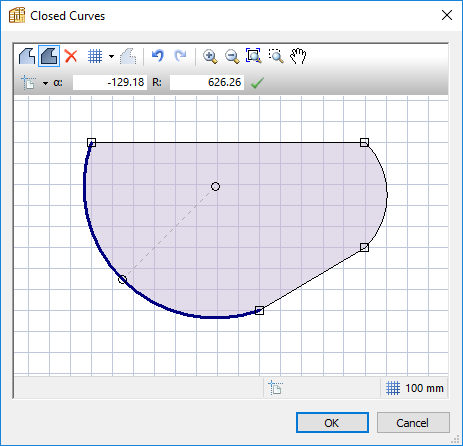
There is a shape editing feature within PolyBoard see the image below.
But you may prefer to draw the shape in CAD and import it as a DXF file, so we’ve created a video to show you how it’s done.
We use AutoCAD here, but any other CAD package should work just as well, including some free solutions.
The following is a transcription of the video.
Draw the shape in CAD
We’ve got the dimensions shown on the left, and we’ll start by creating a rectangle sized to the overall cabinet dimensions.
I’m not going to explain every single operation here as different packages are going to be set up differently.
But in general terms with the corner circles we’re setting the start and finish points of the outer arc.
Here we’re changing some of the drafting settings to then mark out the position of the outer arc shape and then draw it.
Next we’ll make a copy of the arc and move it in to mark the end point for each groove for the wine bottles.

All the unwanted lines are now removed.
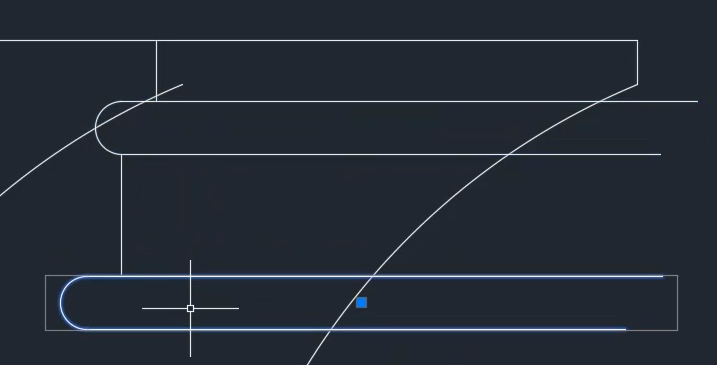
Next up is drawing the shape for each of the grooves.
We start with a circle, and get the dimensions right.
And add the two parallel and trim the unwanted part of the circle.
A small line from the top of the shape gives us the final positioning point we need to slide the first groove into place.
The centre point of the curved groove end intersects with our inner arc.
Now we create positioning points to place 3 more groove shapes, all copies of the first.
And all intersect with that same arc.
We can grab all 4 and create an inversion to place the remaining shapes in the bottom half.
We’re almost done now, we just need to trim all the extra lines we don’t want.
Then create the line we need from top to bottom.
Trim the rest of the outside of the shape away to create the final shape we need.
Convert all the lines to polylines.
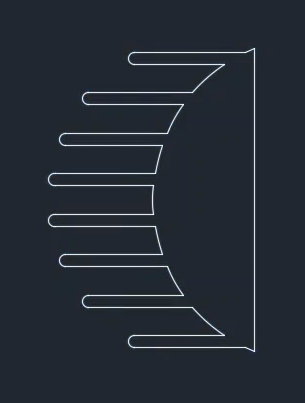
And position our shape at X and Y zero points.
And finally we will save our shape as a DXF file.
Import to PolyBoard
Inside PolyBoard now, go to libraries and specifically the closed curve library in this case.
Select the import icon and load up our shape.
Make sure we select the shape and no extra polylines that might have been in the import.
Click ok and ok again.
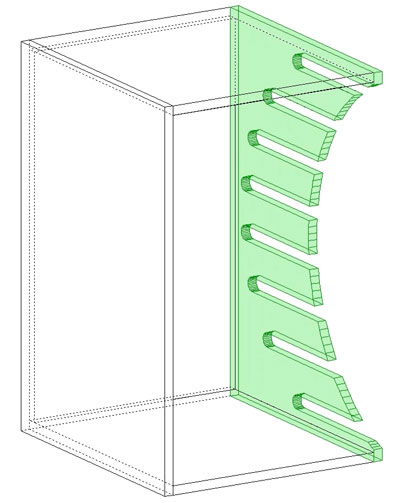
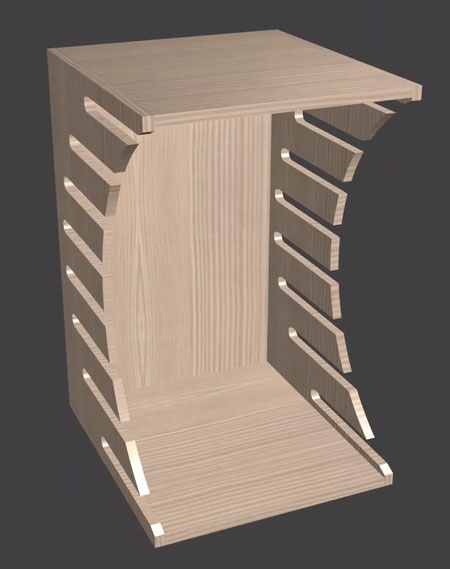
Now to create the wine rack itself, which starts with a simple box cabinet of the correct dimensions.
This has the sides underpassing, so we’ll select a new boxful sub-method with sides overpassing.
Select either side, then open up the structures menu and click on inner tooling.
The green plus button lets us add a tooling.
And we’ll go for the file we imported to the library earlier.
To position it we’ll set the tooling and panel reference points as right centre.
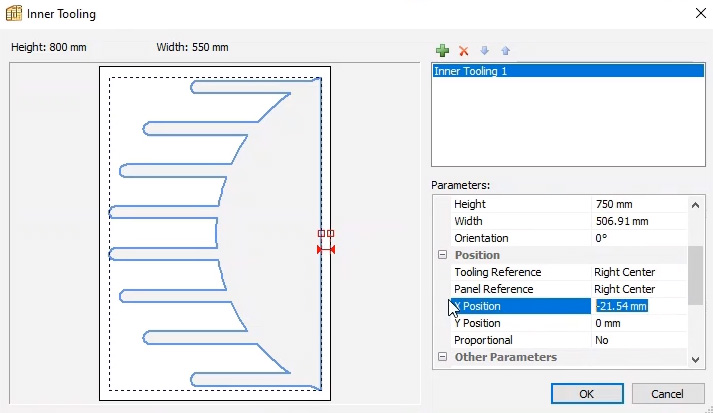
And change the X position to 0 mm.
Click ok and we can see the tooling applied exactly where we want it.
The final thing to do is to select the 3 dots next to our inner tooling in the properties menu.
Copy the structure we’ve created.
Select the other side.
And past the structure there too.
Viewed in 3D we’ve got our wine rack all set up.
PolyBoard next steps
We have many more PolyBoard tutorials here too.
Please leave a comment below or contact us here.
You can register for free here to download and get started with PolyBoard.
Thanks very much for your time.