Wood Designer forum
Introduction of Christopher Pare|Page 11|Forum|WOOD DESIGNER
October 4, 2012


Hi Chris,
Several problems come from having used ‘unboxing” to shape the corner of your unit.
In fact it’s not necessary nor advisable to design this unit using “unboxing” it should be built by drawing the completed shape in the Free Shape editor.
Like this the panels can be qualified correctly according to how they should react.
This is a double sided unit so the back should be qualified as either a “back” or a “side”, if a fixed panel, or “frontage” if you need an open element like a door or drawer or open shelves.
Each element of the curve also needs correct qualification according to how you want to build it. the actual problem is that Polyboard is trying to assemble a thin back part into a thicker side, this is not a coherent situation and will not be buildable.
Your project is quite complex and needs some redesigning starting from the basic shape and integrating the Polyboard elements in a way that they interact correctly.
I would suggest that you buy the CabinetFile service so that I can redesign your project and make sure that you get something buildable and optimised before you start buying and cutting expensive materials.
Hope this is helpful.
All the best,
Ness
Hi guys!
Okay, attached is my updated project. And the following is a list of issues I still have with it.
//
Message body
– Can “Vertical Division [3]” and “Side [4] (Unboxing) [1]” be combined as a single upright? If yes, then I should be able to remove “Vertical Division [1]”, right?
– For some reason, I am unable to ‘assemble’ the “Drawer 1 [1]”… Why?
– Why are “Side [3]” and “Back [1]” so oddly cut? I would have thought that a simple straight side/back (with angled cuts) would have done the trick…
– How would I get the far-right side ‘surface split’ (when viewing from behind) of “Back 4” to become a door? As you will find, I already have shelves in that area… I simply need to get access to them. Note: The unbox will be flush against walls; therefore, I will not be able to access that particular area from the front of the unit. Once I get this done, then I will move onto performing the surface split and giving it some decorative accents.
– This next issue is not a big deal if it cannot be done… But if you have a look at the first version of my bar plans, you will notice that I was somehow able to apply the plinth around to complete perimeter of the unit. Now, I cannot seem to reproduce this. I do not think I am doing anything differently, but I’m sure you will be able to steer me in the right direction to make it happen again.
– And lastly… I am looking to purchase (or maybe even make) the following arm-rail for the bar: (EDIT: link deleted because no longer active). This requires that another 3/4″ (19mm) thick top-shelf in needed on the bar that is set back 4″ from the ‘back’ and rounded side. How would I go about doing this?
Again, Thank You for all of your support on this!
Christopher
November 8, 2013


Sounds like you’ve picked up a lot of knowledge of Polyboard already, and helping other members out would be of great value and much appreciated. Just reading how your project is going is amazing for starters…it brings it all to life.
Good luck and let us know how it goes, and if you want to discuss any aspects of the build, that is if you’ve got time after trying out those new tools. 

October 4, 2012


Hi Christopher,
Good luck with the design and build.
Send me your project file before you start so that I can check it over.
I’m excited to see you moving forwards, keep us updated.
All the best,
Ness
Thank you very much, Ness and Stefan!
Of course! It all makes sense now! I’ll give it a try tonight…
Pretty soon, once I’ve completed my Home Bar, I will feel confident enough to provide help to others in the forum. That is what it is all about, right?
Side note: I will post a picture of my completed Home Bar when done. Stay tuned (it will probably be some time though considering my inexperience)… Your software and support is making my dream come alive (in Technicolour)!!! I just hope that I can produce something that will impress even you well-seasoned craftsmen!
Thankfully I have a good friend who has a hobby woodworking shop (just down the road from me) and he may help me in getting some of the intrinsic pieces cut out for me. For me, my wife got me the best Christmas presents ever… A new Milwaukee portable table saw and a new Rigid portable compound mitre saw!!! I cannot wait to put them into good use!
Christopher
October 4, 2012


Hi again,
sorry I forgot to say that you can look at this video to get an idea on how to set up bowed panels:
All the best,
Ness
October 4, 2012


Hi Christopher,
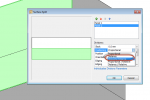
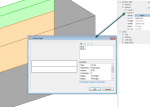
The surface split options “Position>Distance” and “Opposite Distance” enables you to specify a distance from either side of the panel to create the split.
How ever when you add several splits Position option doesn’t work and the command will divide the panel up into equal parts.
This can be very useful but doesn’t allow you to split the panel at several precise points.
The way around this is to use the surface split again on one of the sub panels created with the first surface split command.
One of the very powerful features of Polyboard is that when new panels are created by cutting or machining existing ones, each new panel can be machined again as if it were a just another panel.
The new panels show up in the Properties list and you can surface split each sub panel again and again giving the exact position of each split.
All the best,
Ness
Hi Guys!
Okay, so I’ve figured out that I can do surface splits and thickness splits multiple times… Woohoo!
My question now is on completing a surface split such that the split line ends up being along an upright. It seems that I can only work with percentages rather then using exact dimensions. Am I wrong?
Thanks,
Christopher
November 8, 2013


Hi Christopher,
Nice to see how your design is developing. To answer your questions about accessing those videos and CabinetFile Lite and Pro:
The videos you cannot view are exclusive to Full membership (£10/month).
The CabinetFile Lite service is included in Full membership free of charge.
You need to be a Full member to order a CabinetFile Pro and it is an extra £95 on top of the price of your Full member subscription.
At some point you’re going to need to upgrade to Full anyway so we can send you the manufacturing plans for your design (i.e. order a CabinetFile Lite), so you might want to do this now to access all the videos Ness referenced and any others that are going to help.
If necessary, we can also create new videos for Full members, if for example the resources we have available don’t cover the info you need in enough detail.
As far as CabinetFile Pro is concerned, this is just optional and allows us to work with you on your specific design in more detail, helping you revise it if necessary, and helps to make sure it is as easy to build as possible and basically works in practice.
For basic furniture designs the Pro isn’t normally necessary but if things get complicated it does act as an extra safety net. Ness has suggested it might be a bit more complex, but please don’t feel obliged to go for it. Please do stick with the Lite if you prefer to check things off yourself.
If you’d like to upgrade to Full you can do it on the homepage.
For future reference, once you’re a Full member you can order CabinetFile Pro from this page. If you’d like to stick with CabinetFile Lite, just upload your finished design to this thread on the forum and we’ll send you back the manufacturing info. Same with Pro, just buy it first from that linked page.
Hope that all makes sense.
Ness will come back to you soon on the other queries…thickness split after surface split, and the curved panel issue.
All the best
Stefan
1 Guest(s)


