We are very happy to share this challenging basement stair project, completed by Scott Saxon in the USA.
Scott used our StairFile service, along with the free version of StairDesigner, to complete the design then receive the plans and part by part DXF files for the build.
Find out how it went below, in his words (and pictures).
Please note, Scott generated full size part templates using a CAD package. We also offer this service as an optional add on, it includes full size PDFs ready for printing.
It’s hard to believe this took almost three years to accomplish, but I am extremely pleased with the results. It was way back on 2020-10-02 that I first heard about and joined the Wood Designer Community. We were in the process of renovating an old house that needed everything. And almost everything took precedence over the stair project. Including moving into the house.
The first thing we did was to create the space for the stairs. This happened early because the mud room that had been added on to the house many years ago was just sitting on the ground. With no foundation! So building that foundation was a high priority.
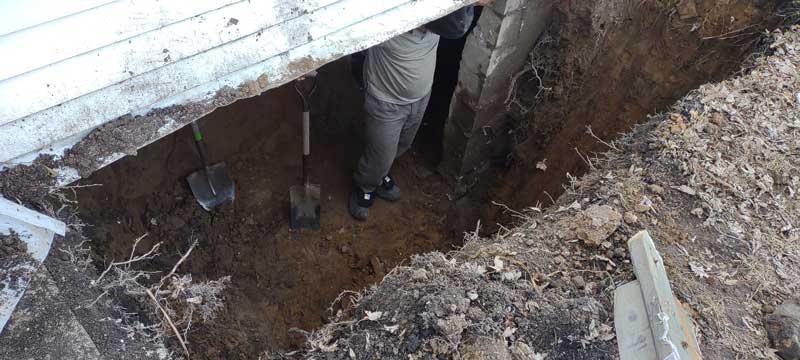
The old stairway was rotten, steep and short and there were only a few decaying stairs that led to a short door that you had to duck down to get through. We ripped out the old rotten stairs, dug out dirt and removed enough mud room flooring to get the space to lay the foundation and build the walls.
This was a huge undertaking considering that we were working under the existing mud room. So other than the trench outside I dug with the Unimog backhoe it was mostly done by pick and shovel. My son Erick, gets most of the credit for this part.
Being a full time stone mason, laying the foundation and building the walls was going to be easy. Oh wait, I’ve never done that before.
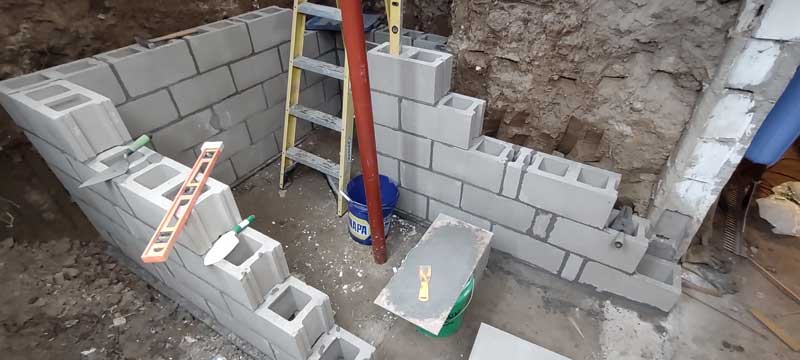
Learning curve. But build them we did and they are as good as any professional could do. Professional, like a recording engineer or mechanic or UAV pilot. That kind of professional. After finishing that part, we used an 8 foot ladder leaned up against the wall to get to the basement. Less than ideal to say the least.
It wasn’t until 2022-05-26 that I even started talking on the forum about my situation.
To say that our amateur mason work left a bit to be desired is being kind to ourselves. We wound up with access to the basement but with walls that are not square with each other and imperfect in other ways. I will use the excuse that the mud room wasn’t perfect either which contributed to the problem. That’s my story, and I’m sticking with it.
Michel from the Wood Designer Forum and I talked back and forth on the forum quite a bit and by 2022-06-17 we had a plan and stair files. He did an incredible job with the limited and flawed information and specs I gave him. I couldn’t be happier with the results.
Next step. Turn the plans into templates.
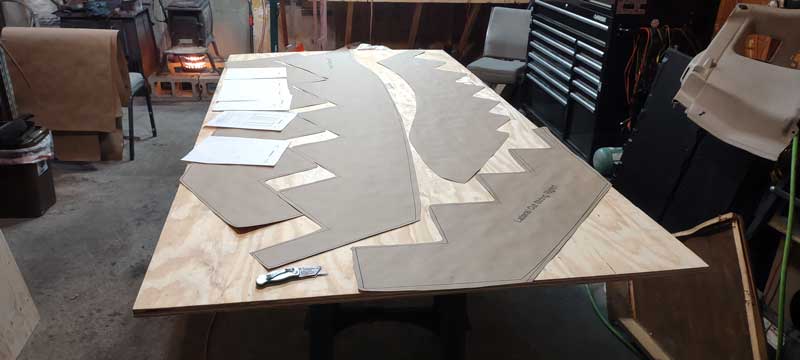
My friend says, “I used qcad to convert the DXF to a version that could be imported to Fusion 360. In Fusion 360 I extruded them to the correct depth and saved them as an STL” Then he “…printed the files via Cura” on heavy construction paper using a vinyl cutter with a pen instead of a blade. I haven’t a clue what he said, but the templates were exactly what we needed to fabricate all the pieces.
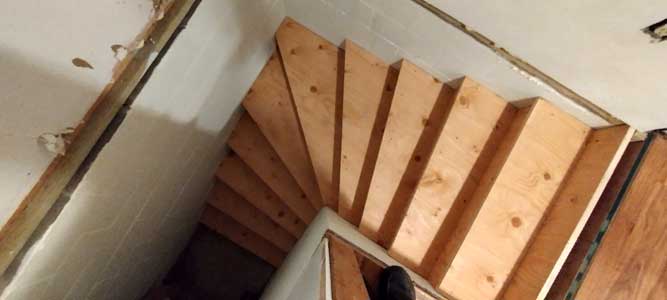
Two sheets of ¾” plywood were screwed together to make the 1 1/2” stringers. I was amazed that by playing with the positioning a bit, all four stringers could be cut from one 4’ x 8’ x 1 ½” sheet of ply.
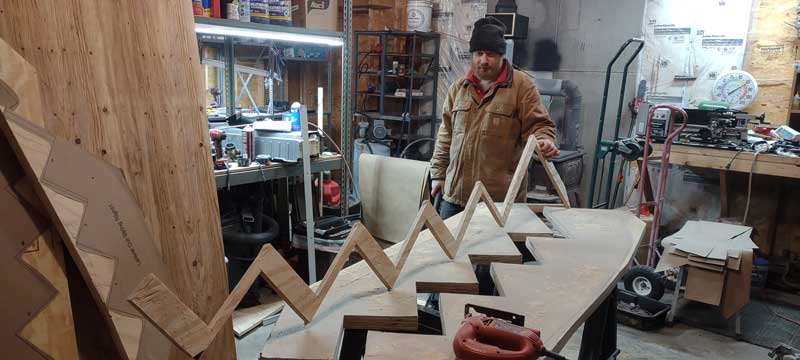
The trick was to turn one of them over so they would all fit. The paper templates for the stringers were then attached to the wood with spray adhesive. They were cut out with a circular saw and jig saw.
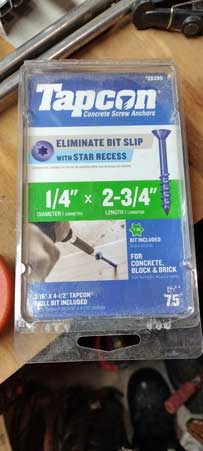
These were then screwed to the brick walls with ¼” x 2-3/4” Tapcon concrete screw anchors. This is where a level was used extensively. First to make sure the steps on the stringers were level and second, to make sure the stringer heights were the same so the steps would also be level from side to side.
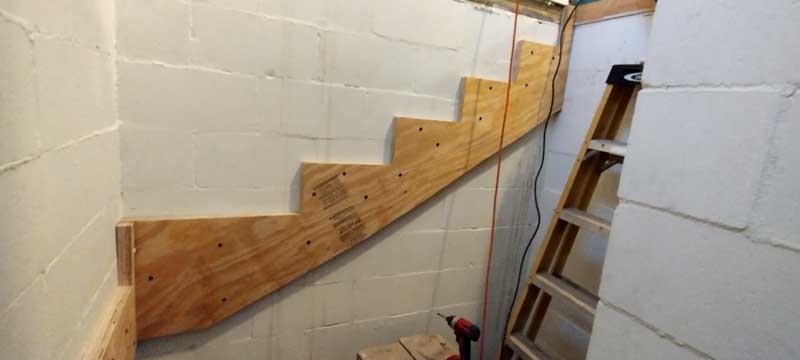
I should mention here that two relatively major adjustments to the stringers were necessary, due to the errors in the bricks and measurements I made. The top needed to be trimmed where it is against the bricks (one side more than the other) and the bottom needed a couple inches removed where it sits on the floor.
Considering how imperfect the space is, I am very pleased with the results. Only the bottom step height is affected. We call this, “Adjusting to fit as needed”. The top change was irrelevant because it just affected where the floor of the mud room met the stairs.
The next thing was to decide on materials for the stairs themselves. That turned out to be a lot more challenging than I thought it would be.
Idea 1: My first choice was to use a nice hardwood and finish them with urethane or something similar to show off the wood. Since the stairs are not all the same dimensions as they go around the corner, I couldn’t use standard dimensional lumber. As I sourced out local sawmill folks, it became apparent that the cost to get single piece stairs wasn’t very appealing.
I could have joined pieces edgewise with pocket screws (Idea 2) to get the dimensions I needed, but then another path appeared.
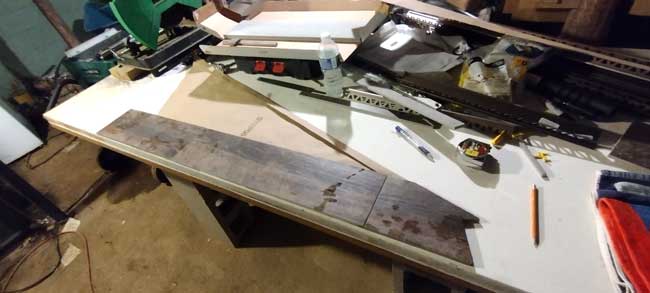
Idea 3: Use 1” plywood and cover them with a high quality ¼” plywood. This would result in all single piece steps and risers. 1” plywood was special ordered. Took over a month to get here, but worked out great.
My friend 3D printed out a small set of parts to scale. These were used to figure out how to best lay out the templates on the wood and we were able to get all the parts onto two sheets of the plywood. Very little scrap. Nice.
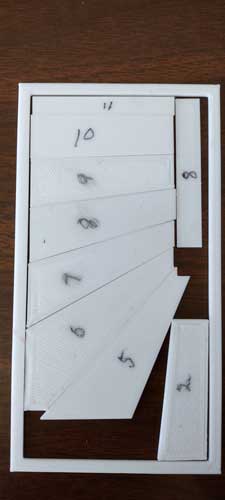
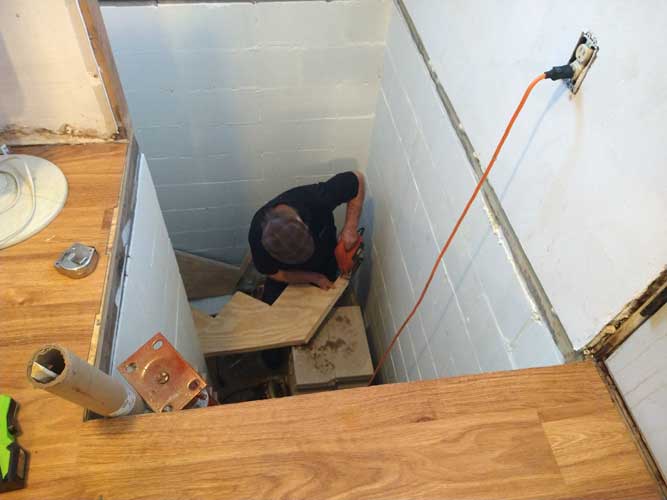
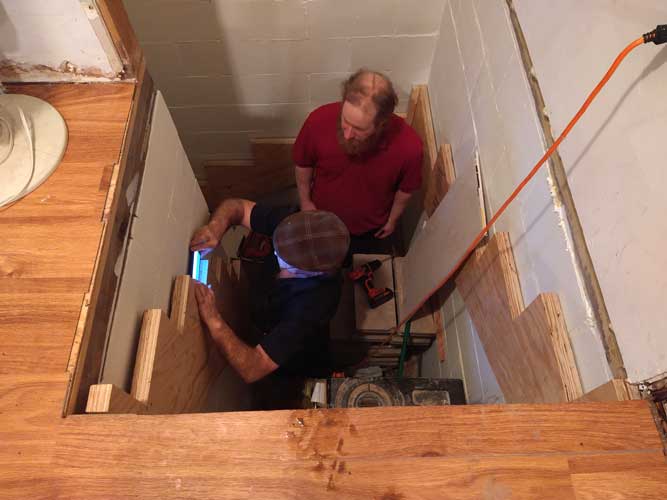
Then each paper template was hand held in place to check the actual fit in the stairwell. Several adjustments were needed due to my inferior measurements and building skills with the walls, but they were minor and it worked out quite well. I cut the templates close to the correct size and proceeded with marking the 1” ply.
The stairs and risers were just marked using the templates. This proved to be a good idea since the templates were used again later. The stairs and risers were then cut and only needed a few more minor adjustments during the actual installation. We will humbly call this craftsmanship.
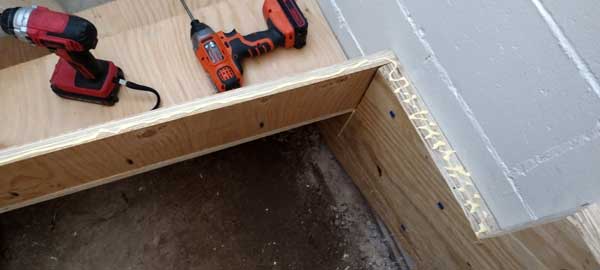
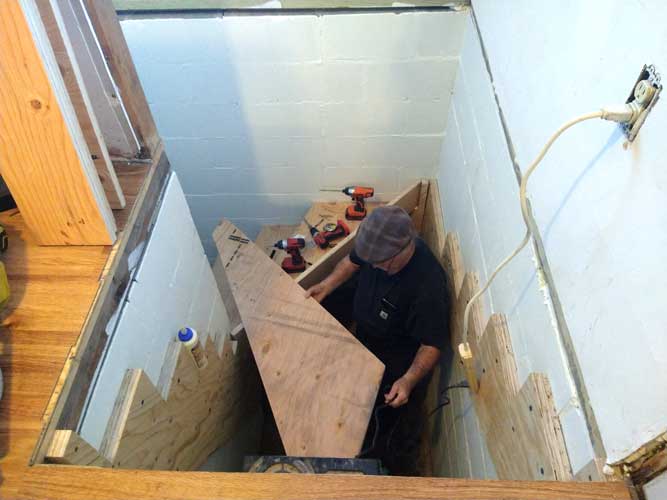
Everything was glued and screwed using pocket screws from the back of the risers to the steps. Vertical screws down through the steps to the risers. It is really solid. We worked from the bottom up so we would have something to sit/stand on while proceeding.
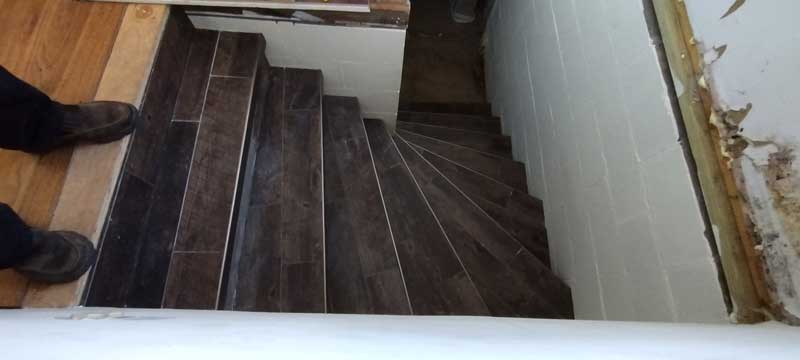
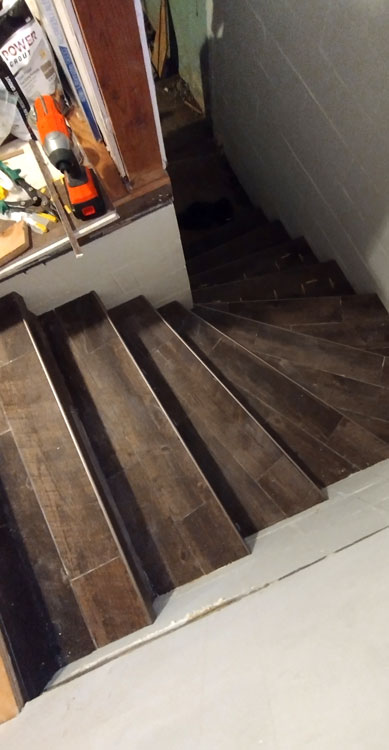
At some point, the idea of using nice ¼” plywood on top of the stairs changed to ceramic tile. Being a full time tile setter, laying the tile was going to be easy… oh, wait a minute. I’ve never laid tile before. Another learning curve. The next step was to cut the stair nosing.
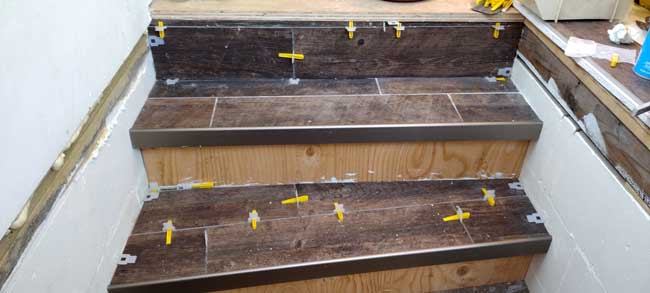
I rented a tile saw and we cut and fit all the pieces in one day and returned the saw. The templates proved to be useful in laying out the tiles for cutting. We laid the tile from top to bottom and only did two steps at a time, so we wouldn’t need to step on them getting out since this old house doesn’t have a usable egress in the basement.
The last step was installing the grout.
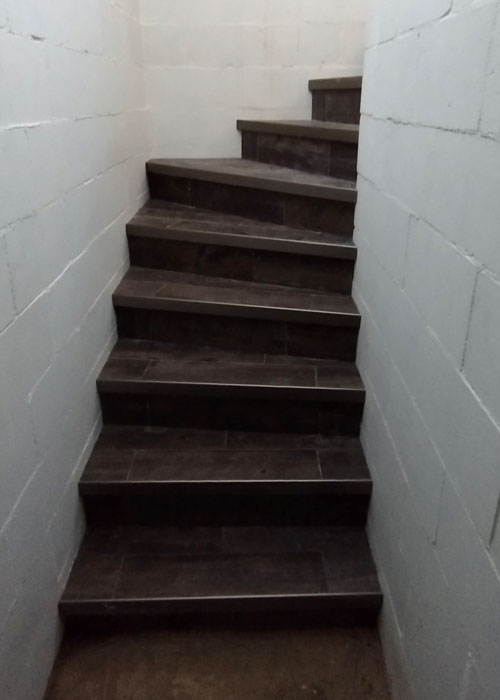
We are extremely happy with the results of this amateur built stairway that we think looks like it was done by pros. Couldn’t have done it without the help of The Wood Designer Community and specifically Michel from the Wood Designer Forum.
A huge thank you to Scott.
We’re really glad StairDesigner helped you complete your project. Sorry we couldn’t help with digging out the basement!
If you are planning a one-off stair project, please check out our StairFile service.
It’s a very affordable way to use professional software without buying, and to access expert advice along the way too.
If you are a professional, we have more more details on StairDesigner here and offer online demonstrations with a member of our technical team.