Designing and manufacturing a staircase can be one of the trickiest tasks in woodwork. However, if you use a 3D stair calculator you can speed up the process massively and at the same time eliminate errors.
It’s much easier to use a staircase calculator than drawing by hand, or indeed drawing using a CAD package. Instead you input the project dimensions, add components and adjust their parameters. The software does the hard work and calculates a safe, good looking and easy to build stair for you.
In this example, we’re going to create a quarter turn right stair using StairDesigner, a professional stair calculator.
Step by Step Summary
Step 1: Take the stairwell dimensions
Step 2: Initial stair calculator set up
Step 3: Optimise for safety
Step 4: Optimise for aesthetics and ease of manufacture
Step 5: Output your stair cut list and plans
Step 1: Take the stairwell dimensions
Without a doubt the most important step of all. Take time to get the stairwell dimensions right, you’ll save much more time in the long run if you do.
Despite your best efforts, 100% accuracy is practically impossible however. For this reason it is a good idea to introduce a minimum play. It’s much easier to add fillers to make a slightly too small stair fit, than to cut down a stair that is too large. Allow for 10 mm play between two walls, or 20 mm if the walls are particularly irregular.
The basic set of measurements you’ll need are shown below, we’ve added in some example dimensions to use:
- The height from floor to floor: 2800 mm
- The length and width of the stairwell which will give the length of each flight in StairDesigner: for example 2000 mm for the 1st flight and 2500 mm for the 2nd flight
- The width of each flight: both 800 mm
- Thickness of the floor joist will also be needed to calculate headroom
And remember to always use the same units of measurement. Don’t change between meters, centimetres and millimetres, or between feet and inches. It is much easier to misinterpret your recorded dimensions if you do.
Step 2: Initial stair calculator set up
Open up the StairDesigner stairs calculator and create a new stair from the model catalogue. Select Model #2 from the ‘Stair without Landing’ list. This is a classic quarter turn to the right stair.
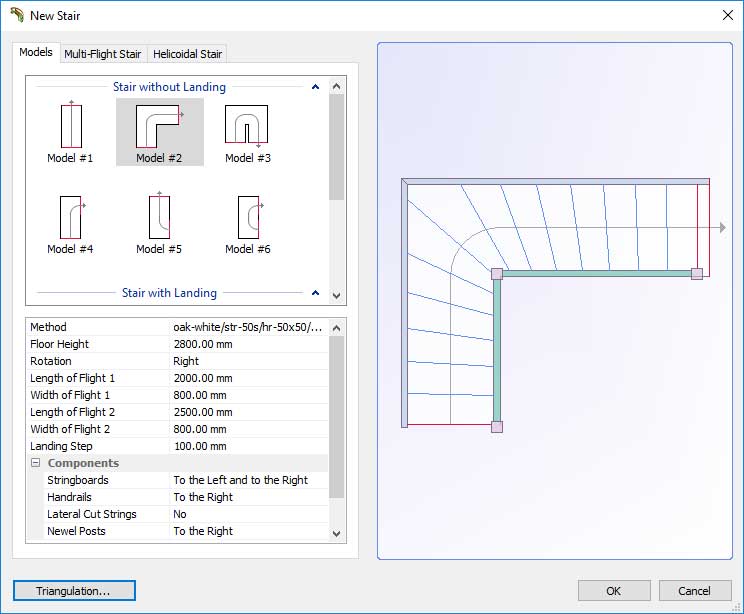
New stair dialogue box in StairDesigner stair calculator
Now enter your overall stair dimensions.
- The overall stair height of 2800 mm, this is the first parameter to enter.
- We’ve got two flights in our quarter turn stair, now we enter those dimensions.
- A good stair width is 800 mm so let’s go with that for both flights as we’ve said above.
- A stair should normally have a landing step as well, let’s include one and set it’s width at 100 mm.
At this stage we can also very quickly set up some other key assembly details:
- Stringboards: let’s have strings on both side of the stair, to the left and the right
- Handrails: just on the right this time as the other side of the stair is against the wall
- Lateral cut strings: these are strings that are cut so the steps sit on the string rather than being housed within them – we’re not using this construction method here so we’ll say no in this case
- Newel posts: to go with the handrails, we’ll chose to have them on the right side only
Click OK and we’ve got our basic design already created in StairDesigner. The image below is taken from StairDesigner and shows the stair in plan view and also in 3D.
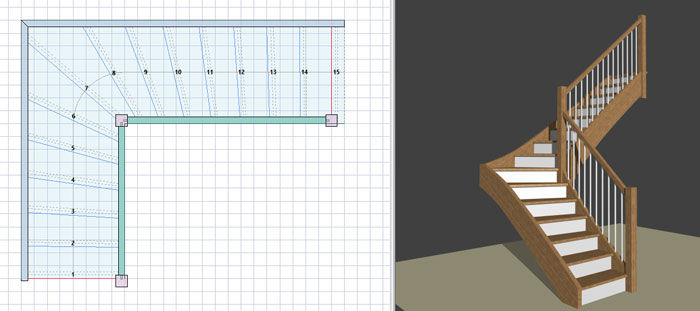
Quarter turn stair in plan view and 3D
Step 3: Optimise for safety
The overall properties of the stair are shown in the Properties menu.

General stair properties
The number of steps is shown by the number of risers. The optimal number of steps/risers is automatically calculated by StairDesigner.
From that number, and knowing already the total height of the stair, the riser height is calculated and shown in the properties as well, along with the tread width (also called the going).
The tread width is the distance from one step nosing to the next along the treadline.
Finally in this section of the Properties menu stair is the Stair Rule calculation.
This value is 2 x RISER HEIGHT + 1 x TREAD WIDTH
There are control values for all 3 of those, shown below.
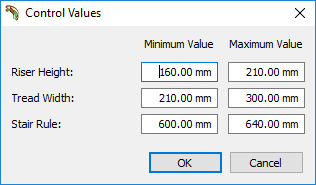
StairDesigner control value
You should set the range of values to promote a safe stair. You don’t want the height of the riser to be too big. You also want a sufficient tread width so there’s enough room for your foot to fall on. At the time of writing, the Stair Rule controls shown apply to a number of countries, but others may be the norm elsewhere.
If the controls are not being met, it’s very easy at this stage to edit the number of riser/steps manually, so the stair complies. As you make this change, all the components of the stair automatically adjust to fit. Our stair meets the control values, so we’ll leave it as it is.
Step 4: Optimise for aesthetics and ease of manufacture
In the stair shown above all steps are gradually tapered in and out of the turn, this is the safest way to build a stair. However, in some countries it is common to have the tapered steps, also called winders, just around the turn. If we want to do this, we can set the start and end winders in StairDesigner, the result is shown below:

Winders just around the turn, applied in StairDesigner
The reason you’d build a staircase like this? Well, it’s much easier to manufacture, most steps are identical and simple.
StairDesigner will automatically calculate the shape of the stringboards following the steps, but you can very easily change them to straight strings if you prefer, again for ease of manufacture or for aesthetics, and adjust the angle of incline so the steps and risers extend into them correctly. The ease of use of this particular adjustment feature makes StairDesigner unique amongst stair calculators.

Stringboard adjustments in StairDesigner
In fact, you can adjust all the components of your stair to create your preferred combination of a good looking design that is as easy as possible to build. For example, we can fine tune the look and position of the handrail and newel posts, for now let’s just take a look at the step and riser parameters.
Some of the step properties are shown in the image below.
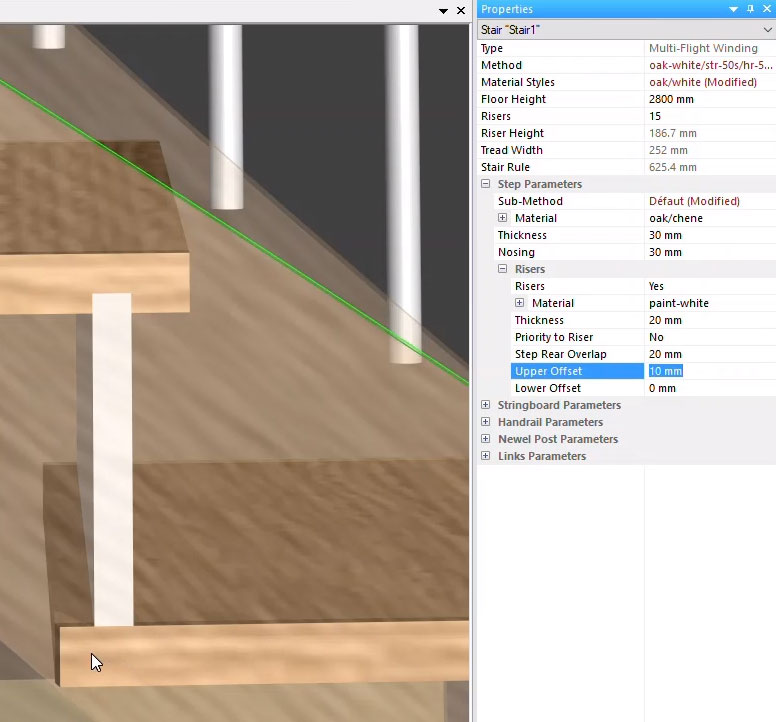
Step parameters
You can see that it’s possible to adjust the material, in fact you can adjust the material of each individual step if you want. You can also adjust step thickness, how wide the nosing is and the exact assembly of riser to steps.
Step 5: Output your stair cut list and plans
Once you’re happy with your stair, output of the manufacturing files is virtually instant. You can print a workshop document containing the cutting list and plans of each part, you can create 1:1 templates, and you can export each part as a DXF or in a range of other file formats for a CNC machine.
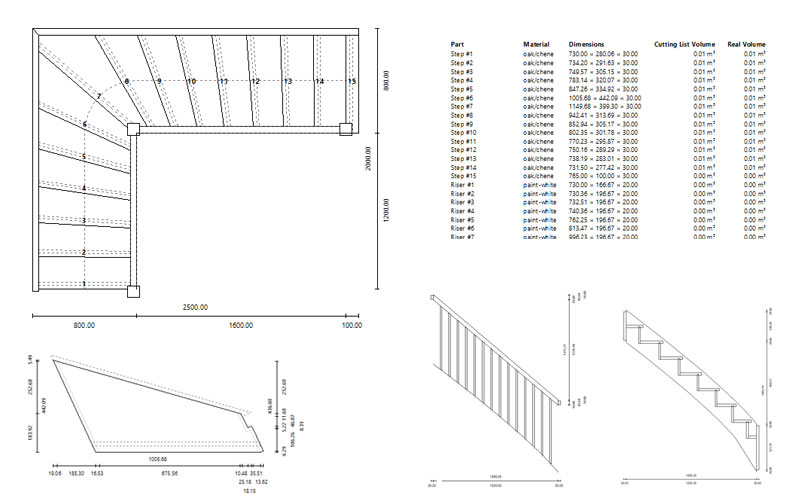
StairDesigner’s cut list and plans
There is the option to buy StairDesigner outright to have immediate access to all this output for your own projects.
Alternatively and for those working on only the occasional stair project, there’s the option to use the free version of the StairDesigner 3D stair calculator. This version allows you to design in full, but it doesn’t give you the output. To get that, sign up for a Premium Support subscription and use our stair cut list and plan processing service.
Please click here to download StairDesigner.
Hi,
I want to get some info about stair production,
I do next month a upgrade to a biesse rover A 4322 ft nesting 5 axis machine. after the 4 year old rover s 4322 ft nesting 3 axis machine.
I do production of furniture for extern woodworkers.
I already buyed stairdesigner some about 5 years ago,
now i am wondering of stairdesigner and a PP can produce cnc files for stairs on the new machine?
thx in advance.
Hello Jonathan, Thanks so much for your message. Yes, StairDesigner can produce output files that integrate into Biesse CNC machines. I will reach out to you by email so that you can discuss further with our technical team. Kind regards, Crystal (Customer Support)